
WebサーバーとPHPのインストール
ラズパイに、Apache と、PHP をインストールして、PHPの動作するWebサーバーを作ります。
Apache、PHP インストール
ラズパイのターミナルソフトを立ち上げ、ラズパイのソフトウエア群をアップデートしたのちに、apt-getでインストール。以下のコマンド入力したらしばらく完了まで待つだけです。
sudo apt-get update
sudo apt-get upgrade
sudo apt-get install apache2
sudo apt-get install php7.0
さらに、PHPで利用頻度の高いデータベース関連ソフトをインストールします。今回は、mySQLとd同等の mariaDB を採用しました。
なお、 phpmyadmin インストール時に、Passwordを設定します。ここでは、忘れないよう [admin]としました。
sudo apt-get install mariadb-server
sudo apt-get install phpmyadmin
以下のコマンドで、Apache、PHPのインストールの確認とインストールされたソフトウエアのバージョンを調べます。
pi@raspberrypi:~ $ apache2 -v
Server version: Apache/2.4.38 (Raspbian)
Server built:   2020-08-25T20:08:29
pi@raspberrypi:~ $ php -v
PHP 7.3.27-1~deb10u1 (cli) (built: Feb 13 2021 16:31:40) ( NTS )
Copyright (c) 1997-2018 The PHP Group
Zend Engine v3.3.27, Copyright (c) 1998-2018 Zend Technologies
  with Zend OPcache v7.3.27-1~deb10u1, Copyright (c) 1999-2018, by Zend Technologies
Apacheのドキュメントルート(Webに公開されるフォルダー)は、/var/www/html の予定です。cat コマンドで設定ファイルを開きフォルダー名を確認してみましょう。
pi@raspberrypi:~ $ cat /etc/apache2/sites-available/000-default.conf
<VirtualHost *:80>
	# The ServerName directive sets the request scheme, hostname and port that
	# the server uses to identify itself. This is used when creating
	# redirection URLs. In the context of virtual hosts, the ServerName
	# specifies what hostname must appear in the request's Host: header to
	# match this virtual host. For the default virtual host (this file) this
	# value is not decisive as it is used as a last resort host regardless.
	# However, you must set it for any further virtual host explicitly.
	#ServerName www.example.com

	ServerAdmin webmaster@localhost
	DocumentRoot /var/www/html         ← ドキュメントルート

	# Available loglevels: trace8, ..., trace1, debug, info, notice, warn,
	# error, crit, alert, emerg.
	# It is also possible to configure the loglevel for particular
	# modules, e.g.
	#LogLevel info ssl:warn

	ErrorLog ${APACHE_LOG_DIR}/error.log
	CustomLog ${APACHE_LOG_DIR}/access.log combined

	# For most configuration files from conf-available/, which are
	# enabled or disabled at a global level, it is possible to
	# include a line for only one particular virtual host. For example the
	# following line enables the CGI configuration for this host only
	# after it has been globally disabled with "a2disconf".
	#Include conf-available/serve-cgi-bin.conf
</VirtualHost>

# vim: syntax=apache ts=4 sw=4 sts=4 sr noet
Apach2の動作確認
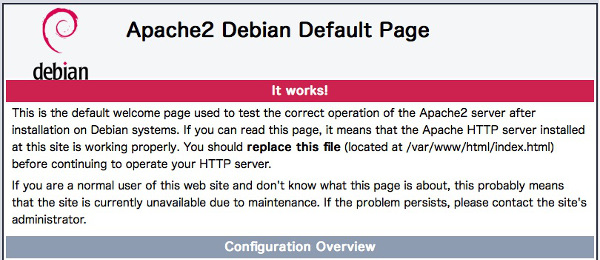
実際にWebサーバーとして機能しているか、Macのブラウザーから、ラズパイにアクセスして確認します。
Macのブラウザーを立ち上げ、アドレス欄に
raspberrypi.local
と入力します。Apach2の「It works!」と書かれたページが表示されればOKです。
PHPの動作確認
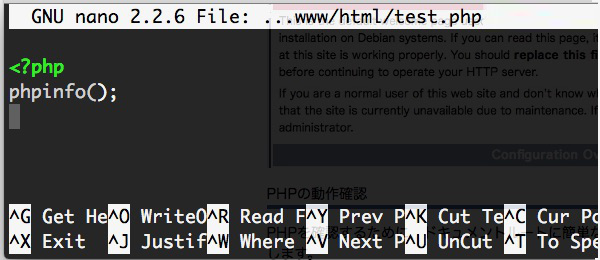
PHPを確認するために、ドキュメントルートに簡単なPHPプログラム (test.php) を作り、Macのブラウザーからアクセスします。
sudo nano /var/www/html/test.php
nano でが起動し、何も書かれていないページが表示されるので、以下の簡単なプログラムを入力します。
入力したら 「Ctl + x」、「y」、ファイル名を確認し、「return」
Macのブラウザーから、ラズパイにアクセスして確認します。アドレス欄に
raspberrypi.local/test.php
と入力します。PHPの情報を表示するページが表示されればOKです。

Apach を ON / OFF する
Apache2の起動は、以下のコマンドで行います。
sudo /etc/init.d/apache2 start
Apache2の停止は、以下のコマンドで行います。
sudo /etc/init.d/apache2 stop
Apache2の再起動は、以下のコマンドで行います。
sudo /etc/init.d/apache2 restart
Apache2の自動起動
Apache2 をインストールすると、ラズパイのパワーオンでApach2 が自動で起動するように設定されます。以下のコマンドを実行し、ディレクトリに apache2 があれば自動起動です。
pi@raspberrypi:~ $ ls /etc/rc2.d
K01apache-htcacheclean  S01cups            S01mysql         S01rsyslog
S01apache2              S01cups-browsed    S01paxctld       S01saned
S01avahi-daemon         S01dbus            S01plymouth      S01ssh
S01bluetooth            S01dhcpcd          S01raspi-config  S01sudo
S01console-setup.sh     S01dphys-swapfile  S01rng-tools     S01triggerhappy
S01cron                 S01lightdm         S01rsync
もし、Aapache2の自動起動を停止したいなら以下のコマンドで停止することができます。
sudo update-rc.d -f apache2 remove
ルートディレクトリの書込み権限
Webサーバーとして使用される「ルートディレクトリ」/var/www/html/ へは、SFTP などでも自由にファイルと転送できるようディレクトリへの書込み権限を変更します。Webサーバーをインターネットに公表する場合は、セキリティー上行ってはならない行為ですが、自宅内だけで使用するので無制限の権限を全てのユーザーに与えています。
sudo chmod 777 /var/www/html
変更が反映されているか確認します。
ls -l /var/www